## 12V Fridge

## 12V Fridge

by Centennial

Medium Install Electrical Systems Model: CB6-250 GC2H

About This Part

Product Name: MT60F 12V Portable Car Refrigerator Volts: 12V/24V DC and 110240V AC (50/60Hz) Capacity: 60 liters / 2.12 cu.ft. Temperature Range: 4°F to 68°F (20°C to +20°C) Power Consumption: ≈45W average Dual Zone (fridge & freezer capability) Energy efficient, low startup surge Description: The MT60F is a popular midsize portable fridge for van life, offering quiet operation, dualzone temperature control, and the convenience of powering via 12V, 24V, or AC outlets. It is wellsuited for longterm travel and camping with low power draw, making it ideal for AGM battery setups. ## PWM Solar Charge Controller Product Name: 50A 12V/24V PWM Solar Charge Controller Max Input: 12V/24V, 50A output Max Solar Input: 700W @ 12V, 1400W @ 24V 4Stage PWM charging (Bulk, Boost, Float, Equalization) LCD display: voltage, current, battery level Waterproof, robust casing Description: The Renogy RVR50 offers reliable, entrylevel solar charging for campervan battery banks. It protects your AGM batteries from overcharge and overdischarge, and its simple interface makes monitoring your system straightforward. ## USB Charger Product Name: Dual USB Power Port Dual USB ports (2.4A max each, 4.8A total) 12V24V DC input Weatherproof cover Highspeed charging compatible with most devices Description: The Blue Sea Systems 1015 provides fast, reliable USB charging for mobile devices in your campervan. Its rugged, waterproof design is ideal for marine and RV use, and installs cleanly on dash or cabinetry. ## 2000W Pure Sine Wave Inverter Product Name: MultiPlus 12/2000/80 2000W pure sine wave output 12V DC input 80A battery charger (when connected to shore or generator) Transfer switch for automatic switching to shore power PowerAssist technology boosts weak shore/generator connections Remote monitoring compatible (via Victron Connect app) Description: The Victron MultiPlus is a premium inverter/charger, highly regarded for reliability, clean sine wave output, and advanced battery charging. It’s ideal for running small appliances, electronics, and sensitive equipment during offgrid adventures[4]. ## AGM Deep Cycle Battery Product Name: Centennial CB6250 GC2H Sealed AGM Local RV dealers (pricing and availability vary) Interstate Batteries: Call for pricing (interstatebatteries.com) 250Ah @ 20hr rate 570 min reserve capacity @ 25A 6V, deep cycle, AGM construction Maintenancefree, spillproof Designed for highcapacity RV house battery systems

Installation Information

Installation Difficulty: Medium

Van Compatibility: Universal for 12V campervan/RV electrical systems (Sprinter, Transit, ProMaster, etc.)

Buying Guide

The Centennial 12V fridge stands out for campervan and RV conversions due to its efficient power usage, mobile durability, and compatibility with off-grid electrical systems. Below is a comprehensive buying guide for this type of appliance:

What Makes This Part Ideal for Campervan Conversions
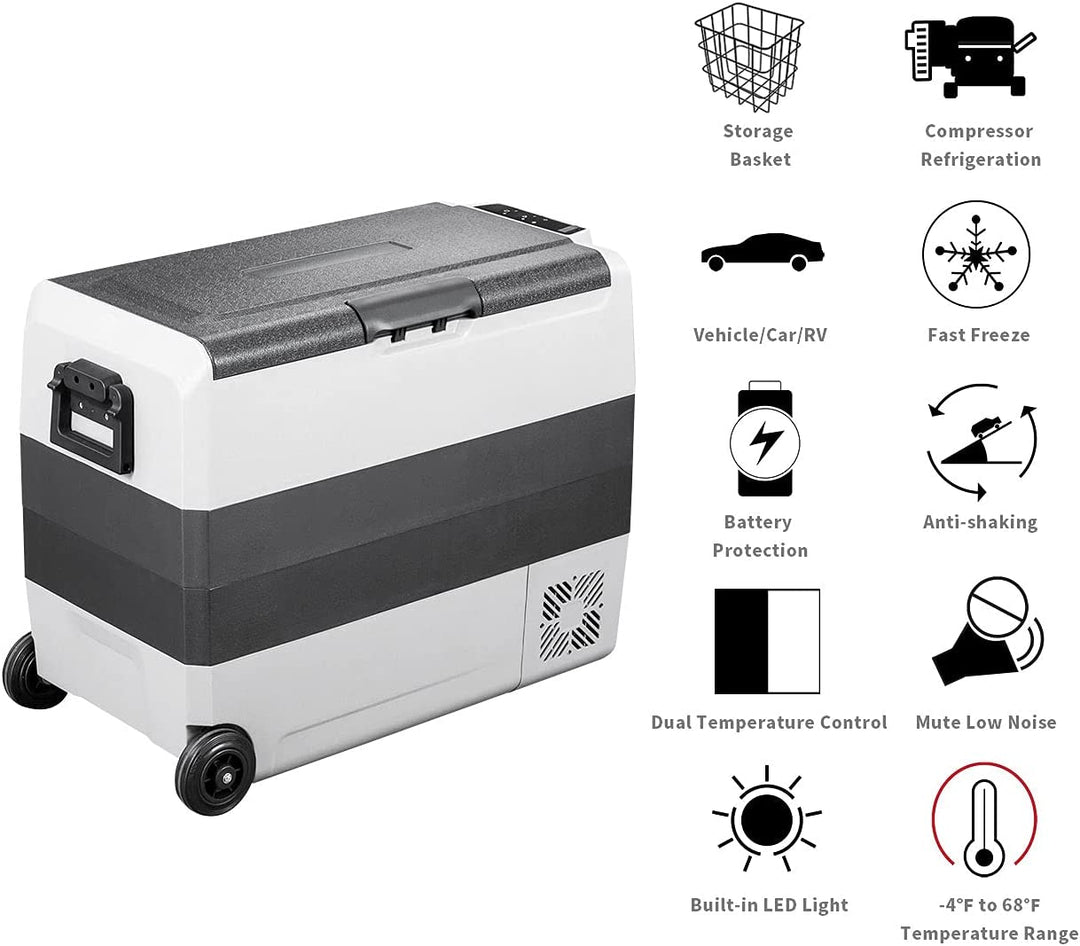
- Runs on 12V DC, allowing direct connection to most campervan battery systems—ideal for off-grid and solar setups[2][1].
- Built for compact spaces, fitting seamlessly into custom campervan cabinetry[1].
- Engineered for travel durability, with vibration dampening and secure travel locks to withstand movement on the road[1][2].
- Efficient power usage conserves battery, crucial for extended trips without shore power[1].

Key Features and Benefits
- Full fridge and freezer compartments—store perishable essentials and frozen foods for longer trips[2][1].
- Adjustable shelves and spacious interiors (commonly 10 cu ft) maximize food storage, outperforming traditional absorption fridges of similar size[1][2].
- Frost-free operation reduces maintenance and hassle when dry camping[2].
- Quiet compressors promote a peaceful environment[1].
- No propane needed—operation is safer and simpler in fully electric van builds[2].
- Travel locks and secure seals prevent spills and keep doors shut while driving[1].
- Easy temperature control, often digitally adjustable, for precise cooling needs[2].

What to Look for When Buying
- Size and capacity to fit your available space and expected food storage needs.
- Amperage draw at operating temperature (look for units around 1A while running)[2].
- Compatibility with your battery/solar setup. Units needing under 7A at startup are ideal for small to mid-size campervans[2].
- Durability—choose models with vibration resistance and robust internal fixtures.
- User-friendly installation (right- or left-side door reversibility, adjustable legs, mounting options)[2].
- Clear warranty and technical support availability.

Common Mistakes to Avoid
- Overlooking power draw—choose appliances that match your battery and solar capacity. Over-sized or inefficient fridges can deplete off-grid power faster than you expect.
- Ignoring fitment—verify both exterior and interior dimensions to ensure the fridge will fit through the doorway and into your cabinetry[2].
- Skipping ventilation space—lack of clearance can lead to overheating or reduced cooling performance[2].
- Cutting corners on mounting—secure installation is critical for safe travel; use proper brackets even if not included.

Best Use Cases
- Weekend warriors benefit from rapid cooling, low power draw, and minimal maintenance—no need to pre-cool with shore power or ice[1][2].
- Full-time vanlifers/RVers gain from large storage, energy efficiency, and reliability for consistent daily use and off-grid living[1][2].

Budget Considerations and Value Analysis
- 12V compressor fridges cost more upfront than absorption (3-way) models, but offer clear lifetime value via lower energy consumption, better cooling, and reduced maintenance[1][2].
- Expect to pay a premium for larger capacities, frost-free operation, and durable construction.
- Energy savings and ability to go off-grid longer with moderate battery setups can offset the initial investment; consider this in your total campervan build budget.

A Centennial-style 12V fridge is a top choice for anyone wanting maximum food storage, true off-grid capability, and minimal power hassle on the road. Carefully assess your campervan's needs and match features accordingly for the best results.

Product Comparison

A 12V fridge is widely favored for campervan or RV use due to its strong balance of energy efficiency, cooling performance, and versatility, especially for off-grid and battery-powered setups[1][2]. Here is a detailed comparison with similar products in the same category:

Alternatives to the 12V Compressor Fridge

Dometic CFX3 by Dometic
- Pros: Extremely energy-efficient (as low as 0.68-1A per hour); rapid cooling (<30 minutes to 4°C); robust build quality; precise digital temperature control[1][2].
- Cons: High up-front cost ($800–$1,100+ depending on size)[2].
- Price: $800–$1,100

Dometic RM8400 (3-Way Absorption Fridge)
- Pros: Can run on propane (gas), 12V, or 120V; useful where electricity is limited; very quiet operation[1].
- Cons: Poor efficiency on 12V (10-15A continuous); much slower cooling (4-6 hours to reach safe temp); less precise temperature control; struggles in warm climates[1].
- Price: $1,000–$1,200

BougeRV 53 Quart Compressor Fridge
- Pros: Good energy efficiency (~2A draw); affordable compared to premier brands; reliable performance; cools to 5°C in about 2 hours[1].
- Cons: Slower cooling than top-tier models; fewer advanced features[1].
- Price: $350–$400

Coleman Powerchill Thermoelectric Coolbox
- Pros: Low cost; lightweight and portable[1][2].
- Cons: Poor energy efficiency (4-5A continuous); only cools up to 20°C below ambient; not suitable for extended or hot-weather van life[1][2].
- Price: $100–$150

Price Range Comparison

  • 12V Compressor Fridges: $350–$1,100 (depending on brand, features, and size)
  • 3-Way Absorption Fridges: $1,000–$1,200
  • Thermoelectric Coolboxes: $100–$150

When to Choose Each Product

  • 12V Compressor Fridge: Choose if you prioritize energy efficiency, need quick, reliable cooling, and expect to run off solar/battery for extended periods (ideal for modern van life)[1][2].
  • 3-Way Absorption Fridge: Useful for off-grid use with unlimited propane, or in situations where running solely on gas is advantageous. Poor for battery-only setups or hot climates[1].
  • Thermoelectric Coolbox: Choose for short trips, mild climates, or strictly budget-limited scenarios. Not recommended for actual "fridge" use in van life[1][2].

Performance Differences for Van Life

| Feature | 12V Compressor | 3-Way Absorption | Thermoelectric |
|---------------------------|----------------------|------------------------|------------------------|
| Energy Use (per day) | 40–70Ah[1] | 120–300Ah (on 12V)[1] | 96–120Ah[1] |
| Cooling Speed | 0.5–2 hours[1] | 4–6 hours[1] | Very slow |
| Temp. Control Precision | High[1][2] | Low[1] | Poor |
| Off-Grid Suitability | Excellent[1][2] | Good (on gas)[1] | Poor[1][2] |
| Cost | Moderate–High | High | Low |

Summary

A 12V compressor fridge offers the best mix of energy efficiency, cooling speed, and suitability for off-grid, solar, and battery-based van setups[1][2]. Absorption fridges are best for those relying heavily on LPG, while thermoelectric coolboxes are only viable for short, budget trips[1][2]. For most van lifers, the 12V option is the clear winner on price-to-performance.

Installation Tips

Tools Required
- Drill and drill bits
- Screwdrivers (Phillips and flathead)
- Wire stripper and crimping tool
- Multimeter
- Electrical tape and heat shrink tubing
- M5 screws or other mounting hardware
- Cable ties
- 12-gauge wire (or size according to your fridge manual)
- Ventilation panels or grilles

Prerequisites
- Confirm your campervan’s electrical system is in place with a suitable leisure battery and fuse block or distribution board[3][4].
- Know basic wiring skills: cutting, stripping, and crimping wires[3].
- Choose the installation location: must be level, easily accessible, and have at least 1–2 inches of clearance on the sides and back for ventilation[1][2][4].
- Check the fridge’s power requirement and wire gauge; calculate cable size to avoid voltage drop, particularly for longer runs[4].

Step-by-Step Instructions
1. Position the Fridge
- Choose a stable, level surface. Ensure adequate ventilation (add grilles if in a cabinet)[1][2][4].
- Elevate slightly (e.g., with plywood) to allow airflow underneath if needed[2].

  1. Secure the Fridge
    - Locate and use the manufacturer’s mounting points with M5 screws or equivalent[2].
    - Add side supports or stabilizing brackets to prevent movement while driving[1][2].

  2. Route and Prepare Wiring
    - Drill a small access hole for wiring from the fridge to the fuse block or distribution panel[2].
    - Cut, strip, and crimp wire extensions if the stock wiring is too short[2][3].
    - Use at least 12-gauge wire or as recommended for your fridge and cable length to reduce voltage drop[2][4].

  3. Connect the Electrical System
    - Connect the fridge’s positive (red) and negative (black) leads to your fuse block or battery—install an isolation switch if possible for easy power cut-off[3][4].
    - Use an appropriate fuse (commonly 15A, but check your fridge manual)[2][3].
    - Seal connections with heat shrink tubing and tape for safety[2].

  4. Test the System
    - Use a multimeter to confirm correct voltage at the fridge connection before turning it on[1][3].
    - Turn on the fridge and let it run—check for stable operation and monitor for voltage drop[4].

Common Mistakes
- Inadequate ventilation—leads to overheating; always check clearance requirements[1][2][4].
- Using undersized wiring—causes voltage drop; refer to your fridge’s manual for wire gauge[4].
- Poor or loose connections—risk of failure or fire; always crimp and insulate properly[3][4].
- Skipping an isolator switch—makes it harder to turn off the fridge and may drain your battery[4].

Pro Tips
- Label all wiring for future troubleshooting.
- Add high and low ventilation grilles if installing in custom cabinetry for optimal airflow[4].
- Regularly check mounting hardware for tightness, especially after bumpy rides.
- If in doubt, consult your fridge manufacturer’s installation instructions.

Time Estimate
- 2–3 hours for those comfortable with van electrical work; add another hour if building new cabinetry or running longer power lines[1][3].

Frequently Asked Questions

Installing a 12V fridge in a campervan is surprisingly straightforward and doesn't require extensive electrical expertise. The installation involves just two wires (positive and negative) and a few basic electrical connections[1]. You'll need to mount the fridge in a suitable location, run wiring from your battery or fuse box to the fridge, and ensure proper ventilation. Essential requirements include adequate ventilation space (1-2 inches on sides and back), a secondary battery system or sufficient power supply, appropriate gauge wiring (typically 12-gauge for most installations), an inline fuse or fuse box connection (usually 3-15 amps depending on the unit), and basic tools like screwdrivers, wire crimpers, and possibly a drill[1][2]. The entire installation can typically be completed in a day, making it an accessible DIY project for most van converters[2].

Yes, 12V fridges are universally compatible with all campervan models including Mercedes Sprinter, Ford Transit, and RAM ProMaster. The compatibility depends on your electrical system setup rather than the van model itself. Any van with a 12V DC electrical system can accommodate a 12V fridge. The key considerations are the distance between your battery bank and fridge location (which affects wire gauge requirements), available space for mounting, and ensuring your van's electrical system has sufficient capacity to power the fridge[1]. Whether you have a small campervan or a larger motorhome, the installation process remains the same - you simply need to account for longer wire runs in larger vehicles, which may require thicker gauge wiring to prevent voltage loss[1].

12V compressor fridges require minimal maintenance, which contributes to their popularity in campervan conversions. Regular maintenance includes keeping ventilation areas clean and unobstructed, periodically checking wire connections for corrosion or looseness, cleaning the interior and exterior surfaces, ensuring drain holes (if present) remain clear, and monitoring the fridge's power consumption to detect potential issues early. The longevity of a 12V fridge depends on the quality of the unit and how well it's maintained. Budget-friendly options like the Bodega 65L can provide years of reliable service, while premium brands like Dometic are known for exceptional durability[2]. Proper ventilation is crucial for longevity - allowing at least 1-2 inches of space around the unit helps prevent the compressor from overworking[2]. With adequate ventilation, regular cleaning, and proper electrical setup, most 12V fridges can last 5-10 years or more in a campervan application.

Common issues with 12V campervan fridges include the unit not powering on, insufficient cooling, excessive power consumption, and unusual compressor noise. For troubleshooting: If the fridge won't turn on, check fuse integrity in your fuse box, verify wire connections are secure and not corroded, ensure your battery has adequate charge, and confirm the switch (if installed) is in the on position[1]. For insufficient cooling, verify adequate ventilation space around the unit, check that vents aren't blocked, ensure the fridge isn't overloaded with warm items, and confirm ambient temperature isn't exceeding the unit's specifications. If power consumption seems high, check for poor ventilation causing the compressor to work harder, verify wire gauge is appropriate for the distance (undersized wires cause voltage drop), and ensure door seals are intact and closing properly. Most issues relate to inadequate ventilation or electrical connection problems rather than fridge failure[1][2]. Always start troubleshooting with the simplest solutions: checking fuses, wire connections, and ensuring proper airflow around the unit.

Selecting the right fridge size depends on your travel style, van layout, and power availability. Consider these factors: available cabinet or floor space in your van layout, trip duration and whether you're weekend camping or full-time living, number of people using the van, and your power generation capacity (solar panels, alternator charging). Popular sizes range from 35L to 65L for most campervan applications. The Bodega 65L is a common choice offering substantial capacity at a reasonable price point[2]. Larger units (50-65L) are ideal for full-time van life or extended trips, providing space for fresh produce, frozen items, and beverages. Smaller units (35-45L) work well for weekend warriors or couples taking shorter trips. Also consider dual-zone capability - some fridges like the Bodega 65L offer adjustable shelving and freezer compartments that can be configured as needed, or even converted to use the entire unit as a fridge[2]. Measure your available space carefully, leaving room for the required ventilation clearances of 1-2 inches on all sides[2].

12V campervan fridges are designed for energy efficiency, making them ideal for off-grid living. Typical power specifications include: operating voltage of 12V DC (some models also support 24V), current draw ranging from 3-6 amps during active cooling cycles, fuse requirements typically between 3-15 amps depending on the specific model[1][2], and recommended wire gauge of 12-gauge for most installations, though larger vehicles may require thicker wire to prevent voltage loss[2]. Energy consumption varies by model, ambient temperature, and how often the fridge is opened, but expect approximately 0.5-1.5 kWh per day (roughly 40-125Ah at 12V). For extended trips or off-grid living, you'll need adequate power generation through solar panels, alternator charging, or shore power connections[1]. A secondary battery bank is highly recommended to prevent draining your vehicle's starting battery[1]. When wiring, always use an inline fuse or connect through a fuse panel for safety[1]. The fridge's energy efficiency is one of its main advantages over 110V household refrigerators, consuming significantly less power and integrating seamlessly with your van's 12V electrical system[2].

Warranty and support vary significantly between budget and premium 12V fridge brands. Premium brands like Dometic typically offer comprehensive warranties ranging from 1-3 years, extensive customer support networks, readily available replacement parts, detailed installation and troubleshooting documentation, and service centers in multiple locations. Budget-friendly options like the Bodega 65L (available for around $360 with discounts) offer similar functionality at a fraction of the cost but may have more limited warranty coverage and support options[2]. When evaluating fridges, consider: manufacturer warranty length and what it covers (compressor, electronics, cosmetic issues), availability of customer support (phone, email, chat), replacement part availability and cost, user reviews regarding reliability and company responsiveness, and whether installation assistance is provided. The price difference between budget and premium brands often reflects not just build quality but also the robustness of warranty and support services[2]. For van lifers who travel internationally or to remote areas, investing in a brand with widespread service networks may provide peace of mind, while those staying closer to home may find budget options perfectly adequate.

You have two primary options for wiring a 12V fridge in your campervan: hardwiring directly to the battery or connecting through a switch panel. For hardwiring directly to the battery, install an inline fuse on the battery's positive terminal, connect the fridge's positive wire to the other end of the fuse, and connect the negative wire to the battery's negative terminal, common ground, or bus bar[1]. This method is simpler and works well for basic setups. For connecting through a switch panel (recommended method), connect the fridge's positive wire to a switch panel mounted in an accessible location, run wiring from the switch panel to your battery or fuse box, and connect the negative wire to the common negative bus bar or battery negative terminal[1]. The switch panel method offers several advantages: convenient on/off control without accessing the battery compartment, built-in fuse protection for power surges, ability to manage multiple 12V components from one location, and cleaner, more organized electrical system[1]. When using a switch panel, ensure you use the correct fuse size (typically 3-15 amps depending on your fridge model) and appropriate gauge wire for the distance between components[1][2]. Both methods are safe and effective when properly installed with appropriate fusing.
Quick Actions